Difference between revisions of "IOS API Documentation"
(→Installation) |
(→Installation) |
||
| Line 14: | Line 14: | ||
# Add iPDCLib.framework to your project like other normal framework. | # Add iPDCLib.framework to your project like other normal framework. | ||
| − | + | ===Bluetooth Instructions(e.g. Ingenico ICMP model)=== | |
# Add "Supported external accessory protocols" to your app's info.plist with value "com.ingenico.easypayemv.spm-transaction" (there is a sample info.plist in the iPDCAPP.zip/iPDCApp/iPDCApp) | # Add "Supported external accessory protocols" to your app's info.plist with value "com.ingenico.easypayemv.spm-transaction" (there is a sample info.plist in the iPDCAPP.zip/iPDCApp/iPDCApp) | ||
# Enable background communication. Add "Required background" to your app's info.plist with value "App communicates with an accessory" (there is a sample info.plist in the iPDCAPP.zip) | # Enable background communication. Add "Required background" to your app's info.plist with value "App communicates with an accessory" (there is a sample info.plist in the iPDCAPP.zip) | ||
Revision as of 03:06, 2 November 2018
Cloud9 Payment Gateway Documentation. This site can also be reached at http://docs.cloud9paymentgateway.com
Contents
Download
iOS SDK Library & Sample Application
Note: For sample code, see iPDCApp/ViewController.m file.
JSON Protocol Reference
The native iOS Payment Device Controller module facilitates payment operations via JSON Key-Value pairs. '
See JSON API Documentation for full functionality info.
Setup
Installation
- Use the API & Sample Download Link above to download the package and unzip it to a local drive.
- Add iPDCLib.framework to your project like other normal framework.
Bluetooth Instructions(e.g. Ingenico ICMP model)
- Add "Supported external accessory protocols" to your app's info.plist with value "com.ingenico.easypayemv.spm-transaction" (there is a sample info.plist in the iPDCAPP.zip/iPDCApp/iPDCApp)
- Enable background communication. Add "Required background" to your app's info.plist with value "App communicates with an accessory" (there is a sample info.plist in the iPDCAPP.zip)
Payment Terminal Setup
For Ingenico IPP320, to find the Payment Terminal IP Address, restart it and hit F2 when you see the RBA version.
Sample Usage
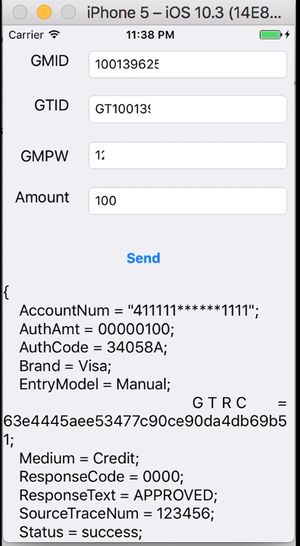
{
"GMID": "2001003223",
"GTID": "GT3010020919",
"GMPW": "03",
"TransType": "Sale",
"Medium": "Credit",
"MainAmt": "100",
"NeedSwipeCard": "Y"
}
API Usage
Basic Flow
See iPDCApp/ViewController.m file and JSON API Documentation for reference
- 1. Initialize
- Call
initWithDelegate - 2. Set general parameters
- Call
setProperties. - → Note:
Prop_PinpadInterfacekey must be explicitly set. This call must be called in main thread only once. :→ NOTE: Also, search forbSupportIPP320variable in sample code to learn how to use Bluetooth or Ethernet for connecting to the payment terminal (ICMP is bluetooth, IPP320 is Ethernet. - 3. Process transactions
- Call
postTransactionToUrl:request:withTimeoutto process transactions. Repeat as many times as necessary. - 4. Get transaction response
- Call
TransDataReceived
API Introduction
See iPDCApp/ViewController.m file and JSON API Documentation for reference.
Class iPDCManager is the main interface.
- 1. Protocol
IPDCManagerNotifyincludes four events - -(void) deviceConnected; ==>trigger when pinpad connected
- -(void) deviceDisconnected;==>trigger when pinpad disconnected
- -(void) TransDataReceived:(NSData*)data; ==>callback function for when postTransactionToUrl api is called. Param data is the transaction return data with JSON format. This format detail can be found in our JSON API Documentation.
- -(void) TrackDataReceived:(NSData*)data; ==>callback function for when readTrackData api is called. Param data is the track2 data with JSON format.This format's detail can be found in our JSON API Documentation.
- 2.
initWithDelegate - Instantiate the iPDCManager class and set the IPDCManagerNotify delegate.
- 3.
setProperties - Set the configurations in key-value format.
- Valid Keys
- Prop_RushMode: enable rush mode or not,default value is "false",valid value is "false" and "true"
- Prop_UploadUrl: set where to upload the rush mode transactions ,NO default value.
- Prop_CheckInterval: interval for checking rush mode transactions.default value is 60
- Prop_FailedThreshold: the max count of trying transactions before enter the rush mode,default value is 3
- Prop_QuickChip: enable quickchip,default value is "true",valid value is "false" and "true"
- Prop_PinpadIP: Pinpad's IP address for ethernet interface, NO default value.
- Prop_PinpadPort: Pinpad's port number for ethernet interface, default value is 12000
- Prop_PinpadInterface: set which interface to use. valid value is "BT" and ETHERNET",NO default value,need to be set explicitly.
- → NOTE: Also, search for
bSupportIPP320variable in sample code to learn how to use Bluetooth or Ethernet for connecting to the payment terminal (ICMP is bluetooth, IPP320 is Ethernet.
- 4.
postTransactionToUrl:request:withTimeout - Process the transaction request. This will send the request to url via https protocol unless it is Store & Forward (Rush Mode). The request detail can be found in our JSON API Documentation.
- 5.
readTrackData - Get track2 data for swipe id cards, in-house gift cards, etc
iPassthruManager (DEPRECATED)
Passthru manager is an older version of Payment Device Controller Manager without Store & Forward. It is maintained for backward compatibility. Click on the following link for information on iPassthruManager
From the makers of Cloud9 Payment Processing Gateway and Creditline Credit Card Processing Software